Planting the Creativity Seed

Planting the Creativity Seed

Through all of the busyness of the holiday season, I've lost a little bit of my creative focus. My creativity was manifesting itself in other ways, Halloween costumes and Friendsgiving decor, Elf on the Shelf and Christmas cookies. Creativity for me comes in many different forms. I feel fulfilled doing almost anything creative, from photography to baking, painting to lettering. 

Read More

Frozen Fever Birthday Party

Henley has been planning her birthday theme for months, in case you're interested she has plans for her fifth and sixth birthday as well.

I tried to keep this simple and just focused on small details that would give the most return.


For the banner I used my Silhouette Cameo to make the shapes and cut out the letters. I also purchased the Frozen Fever jpegs from Etsy and used the Silhouette print and cut feature to cut them out.  I also used these same images for the favor bags. The kraft bags were purchased from Target.


Pretzel rods dipped in light blue candy melts, drizzled with white chocolate and sprinkled with yellow sugar.


Cake was from Publix. They did a great job. 


I had beer and iced tea for the adults and made a punch for the kids. I used blue Hawaiian punch, 0.5 liter of Sprite and about 4 scoops of pineapple sorbet. The kids loved it and I think just the idea of the spout makes them want to drink it. Every time we have a drink in this container Henley and her friends love serving themselves. 

The party was great. I ordered all of the food from Publix to make it easier on myself, subs, fruit and a veggie tray. We were in Disney the few days before so I wanted to be realistic in what I would accomplish. We had a bounce house and the kids were worn out by the end of the day. Besides the record breaking heat, everything was fun. If these temps continue we might be having a December pool party for Henley. 

I still can't believe she's four but it is what it is. More to come from my oldest little one!

::Craftie:: DIY Halloween Queen of Hearts

Halloween is right around the corner and I start looking forward to Halloween in August. I love this time of year and I feel like preparing for Halloween really kicks off our Florida “Fall” (since the weather sure isn’t going to let us know the holidays are fast approaching). This year I was extra excited to get our costumes planned since we were planning a trip to Disney for the Mickey's Not-So-Scary Halloween Party.


This year after some back and forth on various costume ideas, we decided on Alice in Wonderland. Henley was quick to claim the Queen of Hearts as her costume and the rest of us fell in line---Macie as Alice, me as the Cat, and Dad as the Mad Hatter.


One evening while trying to procrastinate bedtime, she was looking over my shoulder as I scrolled through Pinterest. She immediately pointed out one of the pins for her costume, of course it was the most involved of all of the Queen costumes we saw. After some attempts at persuading her to choose a different costume and losing at said negotiations, I took her selection as a challenge.


Admittedly, I was a little annoyed she picked an elaborate costume but once I broke down the individual pieces it came together pretty quickly.


First up was her shirt. I just took a black t-shirt and added a red glitter heart. I heat pressed Heat Transfer Vinyl for hers but there are a few different ways you could accomplish this same look (paint, stencil, iron-on, etc). I then picked up some white satin ruffle from Hobby Lobby and sewed it to the neck for a collar. The picture I was going off of used tulle for the collar but I was sure she would think it was itchy all night.


For the skirt, I used lots and lots of tulle looped around an elastic. I think in the end I used almost 8 spools of tulle. I tried to convince her to have a short tutu but in typical toddler fashion, her mind was made up.


Once I had the tulle tied on in the various colors I tied some black and white diamond ribbon on the sides of the front and knotted the black tulle to look like tufts.


Hobby Lobby sells glitter canvas material (located near the felt) is tons of great colors. I have used this for glitter bows in the past and thought it would be perfect for the hearts on the front of the skirt. I used my Silhouette Cameo to cut them out and attached it to the white tulle using hot glue.


I ordered a headband from Etsy and picked up a wand at Toys r Us to finish it up, she couldn’t be more thrilled. It’s been finished for a few weeks as we were pretty busy and I wanted to allow myself enough time to complete. She has begged me off and on to let her wear it. Being the princess that she is, Queen is the next logical step in her reign.


Have you guys been DIY’ing any costumes for the littles? Please share!!

::Baby G Take 2:: Nursery is Complete

It's done! Albeit, much later than it was done with Henley but either way we are good to go with Macie's Nursery. Here are some pictures and details :-)

dresser, changing table, and crib all from Henley's nursery
Rug from Ikea
Curtains blackout from Target
Turquoise bin for toys from Ikea


Wooden sign DIY
  

Elephant DIY

Monogram Etsy shop 'A Charmed Nest'
Crib skirt DIY
Sheet Babies r Us

Blanket DIY


Recliner Ashley Furniture
Changing pad cover Babies r us
Organization bins Ikea


Decal from Etsy shop 'Leen the Graphics Queen'


Prints from Etsy shop 'Daphne Graphics'


Enjoy! 

Mere :-)

::Love Mere:: Office Organization

Craft rooms---these rooms have a reputation for being messy, clutters, and overall chaotic. Mine was no exception. It's almost impossible to keep a room clean when you are making things and throw in a child and a full-time job and it's virtually impossible....until now!

My husband and I have finally got this room to be perfectly organized, I actually have a place for everything. It's so much cleaner and nicer to be in. I actually can move around without stepping on fabric and the space overall has a better vibe. I just wanted to share some pictures from the office where I spend every night after Henley goes to bed doing my second job that I love, filling orders and making things people love :-)

Hanging Ironing board saves so much space

These organization cubes are Threshold Brand from Target along with the bins---complete lifesavers!


Artwork I've made
I organized ribbons and barrettes in glass jars. The barrettes were organized by color but undoing this is one of Henley's favorite things to do
Ikea Galant Desk with my Silhouette Cameo, Sewing Machine, and Serger.

By far my favorite. Hubs built this for me and it seriously saves me so much time! I love that everything is right there for me to grab at any time. I found a pin here for a very similar board and just altered it to fit my sewing needs.


Embroidery Machine

Hubs desk, also Ikea Galant


Now I can devote all of my time making things for the cutest little ladies and gents.

Do any of you have any craft organization tips to share?? Please do!

Mere :-)

::Craftie:: DIY Painted Lamp

Hello and happy long weekend to all!! I hope your Thanksgivings were all WONDERFUL! Mine was great although tiring---this mama gets pooped way easier than I used to. Typically, the hubs and I host Thanksgiving and we do all of the cooking. This year my brother volunteered to spearhead all cooking organization and took care of the bird, everyone else (myself included) contributed sides and desserts. Even though I didn't do near as much as I typically do, I was so tired!

While the nursery has been "done" for a few weeks, there have been some things that I have wanted to change or tweak now that we have been receiving shower gifts and organizing all of Henley's things. One thing we changed was the lamp. We came across one at World Market that we loved and just had to have. 

Originally we had this lamp in the nursery from Ikea. The main problem with this was the socket for the bulb was so tiny that the lamp didn't put out near enough light for that room.


Once we saw the lamp from World Market, I knew we had to have it. Only problem was that the lamp was off-white and the shade was white. I didn't want to purchase a new shade so to fix this, I decided to paint a diagonal stripe on the white lamp shade. Here are some pictures of the process:


Taped at a diagonal using blue painters tape. I didn't do any crazy calculations or measurements and just eyeballed these stripes. By the time I got to the end, I was out of room and the stripes on the back don't quite line up. This is also where the seam is and it's in the back so I really didn't mind the weird way the sides came together. 


Used Americana acrylic paint


I painted the gray first. In hindsight, the gray without the purple actually looked a little better than the gray w/purple. I could have sprayed the entire white lampshade with an off-white spray paint and then taped off and painted it gray. I think this would have looked a little better and would have helped with all over coverage but live and learn.


Added the purple and used a smaller brush to get close to the gray. Initially where the colors met there was little dots of light showing through here and there so I had to do some pretty tedious touch-ups to ensure every spot was covered. Like I said before, it might make more sense to paint the whole thing one color then tape off the stripes to avoid this.


After all of the painting and touch-ups, I love the end result. Here is the finished project with my lamp based that I LOVE! I think the quirkiness of the owl adds the perfect touch to her room.


I hope you all enjoy the remainder of the weekend! Enjoy it! :-)

Mere :-)

::Craftie:: DIY Pillow

Well the nursery is almost complete, just waiting on a few shipments from Etsy for finishing touches. It feels so good to have it almost complete. I absolutely love the room and I can't wait to share it with you guys!

One of the first thing I made for the nursery was a little owl pillow. I know you aren't supposed to put anything in the crib with the baby but for now, this little guy is just chilling in the crib waiting for Henley to come along.

I saw this pillow on the make it and love it blog and not only was it totally adorable, she provided a pattern to use. Making this first really helped me create a plan for my giant floor mat owl I made (see here).

I got all of my fabric on Fabric.com, they had the best deals compared to some other places I have seen and their shipping was pretty quick as well. Since the blog site has all of the details of making the pillow, I'll just show you guys some pictures I took during the process.

All of the pieces cut and laid out. This fabric is a super soft minky and since it's a furry texture, sewing the eyes out of it looked terrible so I ended up just using felt. The felt works great and was really easy to work with. (This purple for the wings ended up being hard to work with since it was so furry I ended up using a dark purple dot fabric).

The feet are stuffed and all of the front pieces are sewn together here.

All finished and stuffed---ready for Henley! 

This project wasn't too difficult at all, I highly recommend it, especially with the pattern that is provided. 

Hope you all have a great week and I'll be back Wednesday with a weekly update!

Mere :-)

::Craftie:: Fall Pinterest Party

This weekend I hosted my very first Pinterest Party. For those of you not quite sure what this is, it's a party where you and a bunch of friends get together, eat some great food from recipes found on Pinterest, and make crafts or other ideas from...yep you guess it...Pinterest!

I have been working on so many baby crafts lately that I thought a Fall themed party would be a great opportunity to branch out from my baby bubble. 

I made finger foods from recipes that I found on Pinterest (praying they didn't bomb since most were being made for the first time). I thought I would share if any of you were interested in your own Fall themed party.
Yummy!

I was thinking of using this pin to make mini caramel apples but then I saw this idea from this blog to make a DIY Caramel Apple Bar!
I bought bagged, pre-sliced apples for this since I knew the apples would be sitting out while everyone grazed and I didn't want them to brown. I skewered each slice and set out mini chocolate chips, coconut, mini marshmallows and candy corn for everyone to make their own caramel slices. My favorite combination was the chocolate chips with coconut. This was a really fun alternative to caramel apples and everyone was able to make their own variations and try different combinations.

Nothing exciting here, just hummus with carrots, cucumbers, and pretzels.

There have been many recipes (here, here, and here) for various fall trail mixes floating around Pinterest and I took a little something from each of these and came up with this yummy mix.
Fall trail mix: Cheezits, pretzels, Reese's Pieces, candy corn, chocolate chips, and salted peanuts

Pigs in a blanket are always a yummy, quick treat. I attempted to make them "mummy" pigs in a blanket but it wasn't working out so we just settled on the norm.
This recipe for stuffed mushrooms got tons of great reviews but didn't really seem to have much substance, various reviews altered it by adding sausage or crab. I added chicken Italian sausage to the mix and dipped the mushrooms, once stuffed, in bread crumbs and grated Parmesan cheese prior to baking.

This dip is delicious! It's a pumpkin dip with cool whip and was light and airy while still quite tasty. 
The creator of this used Nilla Wafers and apples as dippers, the apples were my favorite.

Decor from Jo-Ann's and everything fall was 40% off.

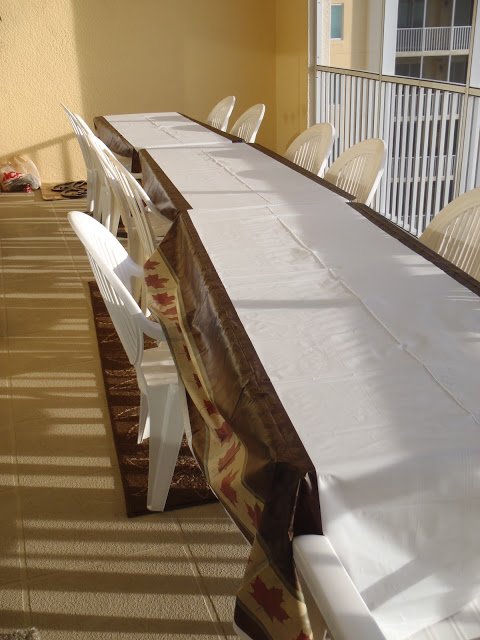
My father-in-law brought tables over that I put end to end on the balcony since our inside space is quite limited. Thankfully the weather wasn't too hot or humid once the sun set.
Fall table cloths also from Jo-Ann's. 

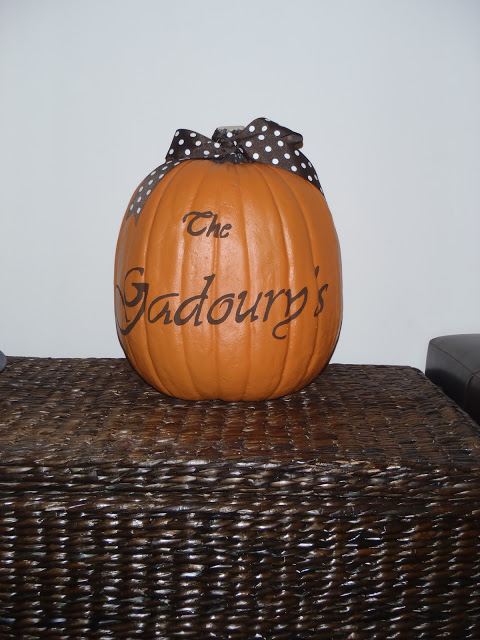
I didn't get pictures of anyone's crafts before they left but here is what I made based on this pin. I printed out the letters on legal paper and used an exacto knife to cut them out. Then I taped the outline of the letters to this foam pumpkin and traced the letters with pencil. Using acrylic paint in brown and a teeny paint brush I filled in the letters and topped it off with a brown polka dot bow. It's in our foyer as a cute way to greet guests.
It was a pretty quick and easy craft which I recommend for these kind of parties since you don't want anything too complicated.

This party was pretty fun and was one friend even suggested we make it a seasonal thing. Have any of you attended a Pinterest Party? What do you think?

Monday is over friends---one step closer to the weekend!

Mere :-)

::Baby G:: Owl Floor Mat

The nursery is almost done and I have been a crafting fool lately! The latest craft I made was an owl floor mat for the baby to play on. I found this one on Pinterest and I loved it but not only was it sold out but the color scheme didn't really match our theme either. After much consideration, I decided that making this was totally doable but I had some trouble getting started, I had no measurements and no pattern. Luckily I have a husband that works in construction and he helped me out big time.

First I printed the image offline and my husband went to work measuring out the full size and all of the individual parts (check out all of those measurements!)

We then taped two large pieces of freezer paper together to create a pattern. Once we had the measurements that we came up with plus the overall shape of the owl, we were ready to start cutting and constructing.


Here are some pictures of the process: 
All of the main pieces cut and waiting to be put together.

Fitz swears I am making this for him...

I did not use minky for the eyes since I didn't have white or black, I ended up using felt and I think it worked great.

Front and back put together

All Finished! I used batting for a bed comforter, doubled up, to make the inside padding and it seems to be just enough, we have tons left over.

When initially selecting a fabric, I didn't realize that minky would be any different to work with than other fabrics I have worked with in the past. I quickly learned that is not the case. I made a blanket first and then a pillow, which I'll blog later, and I realized these fabrics slip and slide like crazy. My biggest problem was seeing that my fabric which lined up perfectly when I started would be shorter by 5" or so on the top than on the bottom by the time I got to the end. To say the least, I got very comfortable with my seam ripper. 

After a few google searches, I found I am not the only person to encounter these problems and the easiest solution seemed to pin, pin, pin. I used so many pins that there was not a blank space on the edge that wasn't pinned and I waited until the last possible moment to remove the pin before it went under the sewing needle. Once I realized this, all sewing was perfect!

One warning on the minky though, it fuzzes like crazy when cut. My craft room is covered in "minky dust". Every time I looked down, my whole belly was covered in fuzz, I eventually kept a lint roller right next to me for my shirt, the desk, or even Fitz. Check out this picture where he fell asleep under the desk...

Overall I am extremely proud of this and so excited how it turned out. This is the first time I have really sewed something with a pattern I created and it actually worked. I used the same process as the pillow I made which did have a pattern so I think that helped. I'll be sure to post the pillow and blankets soon.

Tomorrow I begin my last week in the second trimester---insane! This pregnancy is flying by! Happy Tuesday all!

Mere :-)